Trigger Mode on Honeywell Barcode Scanners
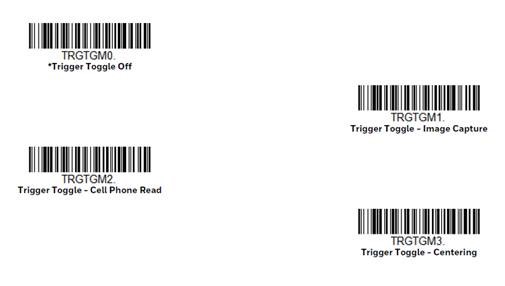
Trigger Toggle mode is a newer feature that lets you quickly hit the trigger on your Honeywell Xenon 1900/1902 two or three times to temporarily put the scanner into either imaging mode, cell phone read mode, or centering mode. Here is where you’d use this feature.
Example 1: If your application occasionally involves scanning digital barcodes. Cell phone read mode can slow down your scanner a little when scanning non-digital barcodes. “Click, click” and you’ve temporarily turned on cell phone read mode to quickly read that digital barcode.
Example 2: Or maybe you love the broad view of your Honeywell Xenon, but you have one barcode that you have to scan that’s bunched together with other barcodes that you don’t want to scan. “Click, click” (activate centering mode) and you’ve temporarily narrowed your scanner’s field of view to hit that one barcode you need in the bunch.
Here is how it works.
1. Scan the barcode of the desired toggle mode:
2. Set the number of triggers required to activate the Trigger Toggle Mode:

If you’d prefer, you can then set the trigger timing (how fast you need to hit the trigger) if the default of 400ms doesn’t work for you. See User’s Guide for Trigger Timing barcode and instructions. And you can set the Trigger Toggle Timeout (time period before reverting back to regular scan mode) if the default of five seconds doesn’t work for you. See User’s Guide for details.
For assistance with setting this up, contact your Barcodes, Inc. Account Manager or reach out to our Professional Services Team.
Convenient Honeywell Scanner Data Reset Codes
Honeywell scanners provide some of the most extensive programming options from any manufacturer. Especially when using scanners for multiple purposes, it can be very convenient to keep these key scanner reset codes around.
- Factory Defaults: The scanner’s settings that are done at the factory during manufacturing.
- Custom Defaults: Any changes to the scanner’s setting that one makes permanent. Making changed settings permanent will be the topic of a future Scanner Gram. Once Custom Defaults are set up/saved – they become “Factory Defaults”.
- Data Formatting: Program the scanner to edit, delete, append scanned data.
Defalt
Scanning this barcode sets your Honeywell scanner back to factory default including getting rid of any special Data Formatting you have your scanner doing. If there are any saved Custom Defaults (See above Custom Defaults) scanning this barcode takes the scanner back to your saved Custom Defaults – not all the way to true Honeywell Factory Default.
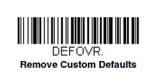
Defovr
Scanning this barcode clears any Custom Defaults that have been saved to your scanner – but that’s all it does. It does not send your scanner back to Honeywell Factory Default. Note one VERY important item – DEFOVR will disable plugins (EasyDL, Easy BCBP, etc.) and you may need to reach out to tech support to re-enable them.
So if you are not sure what your scanner has been through, and you are sure the scanner has no plugins, and you want to get it back to true Factory Default – scan Defovr then Defalt. That’s what I am going to be doing going forward when I get demo gear.
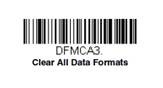
DFmca3
Dfmca3 is the command that clears any Data Formatting you’ve programmed your scanner to do. It does not clear any scanner settings or send your scanner back to Factory Default.