

Zebra FetchCore Software
Intelligent Automation for Robotics
 Full specifications (PDF)

Price Match Guarantee
Found a better price? We'll match it within 60 days of your purchase.



Zebra FetchCore Software Options
-
Zebra BCI-Robotics-Solution Mobile Robotics
To implement effective robotics solutions quickly and confidently, contact Barcodes, Inc. for a quote. We have proven experience and direct access to AMR manufacturers, suppliers, and engineers. And long after implementation, you can count on us for 24/7 service and support.Item on backorder — chat for lead timePlease Call for Pricing or to Purchase
Zebra FetchCore Software Model Overview
- Fastest time-to-automation Implement AMRs in days, not weeks
- Adapts to changes instantly ie instantly adapt as your operations change.
- Seamlessly integrates with other software.
- Secure & Reliable Industry-leading security through the cloud
- Simple to use, simple to manage Featuring a simple and intuitive user interface
FetchCore Enterprise Software and Services is the foundational platform for deploying and fully integrating a broad range of automated workflows into warehouse operations.
Fastest time-to-automation
Implement AMRs in days, not weeks
Adapts to changes instantly
28 instantly adapt as your operations change.
Seamlessly integrates with other software
Th fs
Secure & Reliable Industry-leading security through the cloud
Simple to use, simple to manage
Featuring a simple and intuitive user interface
Build maps
Create accurate maps of your facility
Annotate maps
Create keep out areas, destinations, speed zones, preferred paths and more
Interact with robots on map
Select real-time viewing options
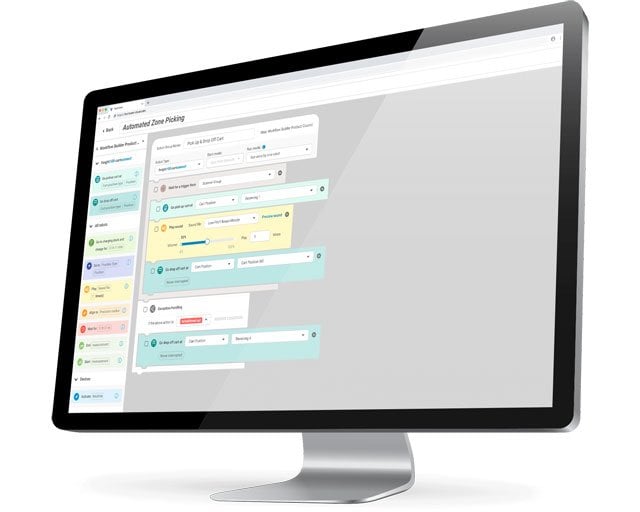
WorkFlow Builder
Drag & drop to create complex robot actions
Example Robot actions
Sample actions of robot functions
WorkFlow Scheduler
Assign and schedule robot tasks
Traffic Management
Optimize robot route planning
Reports
Setup and export robot performance reports
Analytics
Review robot data insights
Adding a data survey route
Optimize robot route planning
Create a new map
When mapping your facility, the robot uses laser sensors to scan the environment. You can preview the map in FetchCore as you scan it.
Prerequisites
Make sure the entire area has Wi-Fi access. Connect a robot to the network. Enable joystick mode. If possible, install charge docks prior to mapping so they will appear on the FetchCore map and can be used to align annotations.
Duplicate Map
Once you've finished building a map, you can manipulate the map using the tools on the right side of the map.
Use Wifi map to view the coverage and strength of individual networks and their corresponding access points throughout your facility at the time of mapping.
Display the grid to help create straight lines when adding annotations to the map such as keep-out zones and preferred paths.
Rotate Map
Use Rotate Map to fix the orientation of the map after building it.
Zoom in
Use Zoom in to increase the size of the map. This is useful while placing annotations or localizing a robot.
Zoom out
Use Zoom out to decrease the size of the map. This is useful while placing annotations or localizing a robot.
Check WiFi Coverage
Use Wifi map to view the coverage and strength of individual networks and their corresponding access points throughout your facility at the time of mapping.
Map annotations
Map annotations provide information about your facility. Robots use this information to successfully perform tasks and navigate the environment. Most facilities have restricted areas for certain personnel or vehicles. Your robots benefit from the same regulations once they know about them. By annotating the map, you are helping the robots understand your environment. The robots comply with safety regulations such as keep- out zones, speed limit zones, or directional preferred paths. Annotations are also added to tell robots where to navigate to perform workflows. We recommend adding Keep-out Zones, Speed Limit Zones, and Charging Docks first. Once they are added, you can create workflows with Robot Positions, Preferred Paths, Cart Positions, Precision Markers, and Survey Routes.
FetchCore Annotation Options
Preferred Path Survey Robot Keep-out Speed Obstacle- Charging Cart Precision Text Route Position Zone Free Area Dock Position Marker Label
Interacting with robots on the map
View live streaming data from robots In FetchCore, open the Robots module. Select the robot you want to add or move from the list in the left pane. The right pane updates with information about the selected robot. In the Settings panel of the robot's page, select a map from the dropdown. Below are selectable options for each individual robot on the map.
WorkFlow Builder
WorkFlow Builder workflows are the easiest and most efficient way to build and schedule the tasks you want your robots to complete. WorkFlows consist of actions and groups of actions (action groups) that you define for future use. Each WorkFlow must contain at least one action group. An action group is a reusable pattern of activity. You can use action groups to build complex workflows. The first action group in the workflow is started for you, but you must create additional action groups in your workflow by clicking + New Action Group in the upper right corner.
Create Custom WorkFlows
Actions An action is an instruction from FetchCore to your robot. Workflow Builder provides a drag and drop interface where you can arrange actions into groups of actions and reuse those action groups in workflows. There are many available actions in WorkFlow Builder — below are a few examples. Go pick up cart Sends a CartConnect robot to a specified cart position or cart position group and connects to the cart. Go drop off cart Sends a CartConnect robot to a specified cart position or cart position group and disconnects from the cart. Go to charging dock Sends a robot to a specific or auto-selected charging dock to charge for a specified amount of time. Go to Sends a robot to a specific robot position or robot position group.
Exception handling
Allows you to specify how a robot behaves when the previous action times out or fails.
Schedule Workflows
The WorkFlow Scheduler provides an easy way to assign robots to workflows and define when and how often workflows are executed. Using the WorkFlow Scheduler, you can quickly visualize which robots are currently scheduled for a workflow. The Workflow Scheduler operates much like any popular calendar application. Using this comparison, a workflow is like a person. You can schedule a workflow for multiple events of different durations and recurrence in the same way you can schedule a person for multiple meetings of different durations and recurrence.
Traffic Management
In a deployment with a large fleet of robots, multiple robots might try to pass through the same intersection at the same time. Enabling traffic management on a map helps the robot to automatically optimize route planning around intersections that have two or more incoming lanes. An incoming lane is a preferred path segment that ends at a node. The following figure shows intersections with three incoming lanes: About Bluetooth robot coordination Nearby robots use Bluetooth to communicate their positions and travel paths to one another. This ability makes navigation more efficient, especially in areas where multiple robots encounter each other. Because Bluetooth coordination is independent of the traffic management functionality in FetchCore, it is useful as a backup system when dealing with high-traffic environments.
Reports
Schedule weekly email reports and view report data visually on charts in the reports module. Report templates allow you to set up reports on the performance of your robot fleet including: * Deliveries: The number of deliveries made per robot. * Distance Traveled During Deliveries: The distance traveled in meters per robot. * Robot Utilization Per Robot: The percentage of working vs idle time per robot each day. * Average Robot Utilization: The average percentage all robots are utilized per day. Once information is collected, visualize data in the Charts tab.
Analytics
In the Overview tab, you can view: * The number of days robots have been active * The number of deliveries the robots have made to date * The distance the robots have traveled in kilometers * The number of hours saved * The total number of robots in your fleet * The status of robots per map To view details about each robot, click on a status. For example, if you click on error you will see a list of robots in the error state and the type of error.
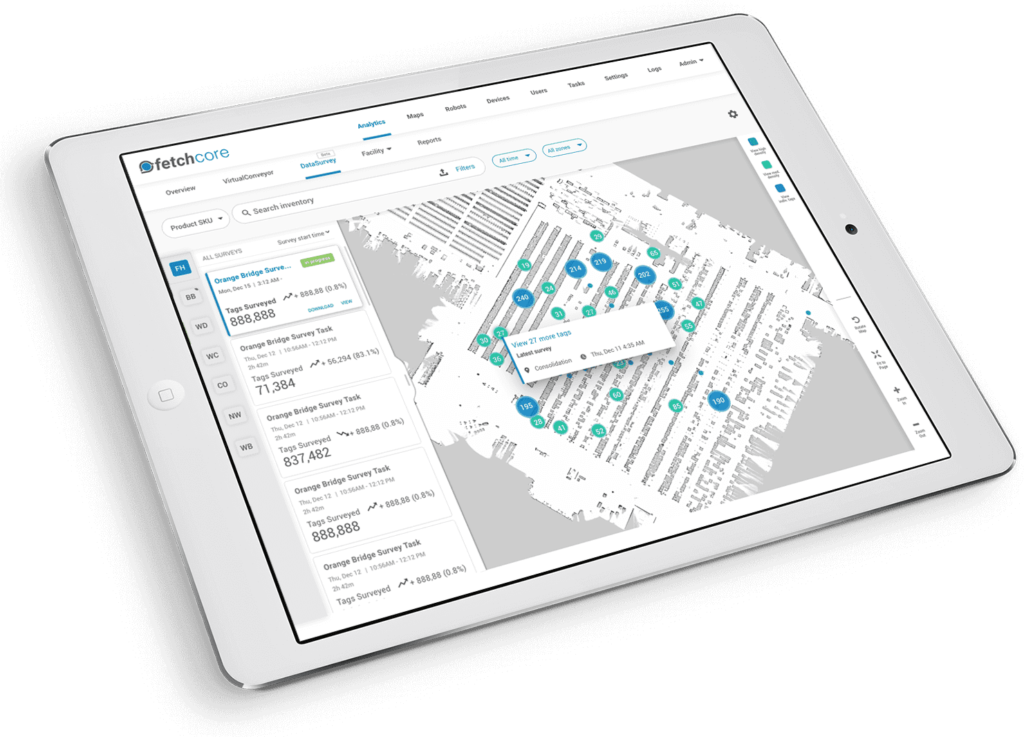
Add a survey route on the map to define where a TagSurveyor robot travels in your facility to collect RFID data.
The data survey results show the detected, undetected, and unexpected RFID tags on a survey route. The completed survey shows clusters of RFID tags on the map with the total number of tags within each cluster. The Detected = Undetected = Unexpected total number of tags surveyed will be equal to the sum of the tags in all clusters. 334 DETECTED 4S, The survey results show three categories of tags: * Detected: Tags that were detected in the current survey. * Undetected: Tags that were included in the uploaded inventory file or detected in the previous survey but were not detected in the latest survey. * Unexpected: Tags that were not included in the uploaded inventory file or not detected in the previous survey but were detected in the latest survey.
DataSurvey Module
The data survey results show the detected, and unexpected RFID tags on a survey route.
Create a new map
When mapping your facility, the robot uses laser sensors to scan the environment. You can preview the map in FetchCore as you scan it.